Invoices
Invoice Menu Screen
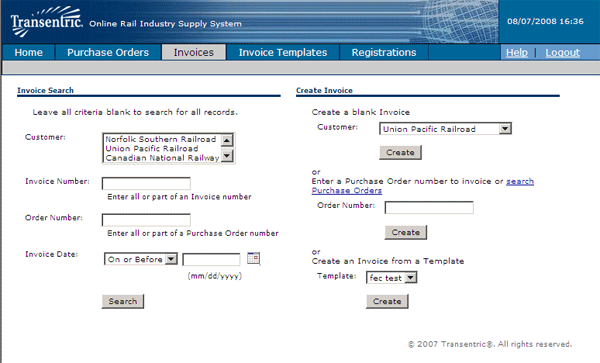
The Invoice Search section of the window is used to search for Invoices
using a number of different selection options. You can request a single
Invoice, or you can request a list of Invoices that match certain selection
options. You may select as many or as few search options as you want.
If no search options are selected, a list of all Invoices on file is displayed.
Invoices remain in ORISS for approximately 150 days.
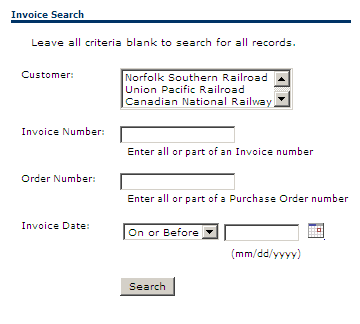
The Invoice selection options are:
- Customer:
A list of the Railroads you have registered to send Invoices to is
displayed in this text-box. Click on a Customer name to limit the search to
only Invoices sent to that Railroad.
- Invoice Number:
To display a specific Invoice, enter your Invoice Number in this field.
- Order Number:
To display the Invoice for a specific Purchase Order, enter the P/O number
in this field.
- Date:
Select this option to limit the search to Invoices sent during a specified
time period. Click on the first text box to select either the Before or After
options. Then, enter the date reference (mm/dd/yyyy) in the second
field. You can also click on the calendar icon to display a Pop-up Calendar
to select a date.
- Search:
After selecting your search options (if any), click on this button to process
your request. An Invoice Summary is displayed with a list of any Invoices that
matched your selection options.
Invoice Summary
The Invoice Summary window displays a list of Invoices (if any) that matched your
specified search options.
The Search Filter text box identifies the search options that you selected.
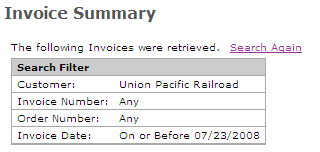
This box shows invoices that match your search options. To display an invoice, click
on the highlighted Invoice Number.

Invoice Detail
The Invoice Detail window displays a specific invoice as sent to the specific
Railroad Company. You can view the entire invoice by using the browser scroll bars
on the side and bottom of the browser window.
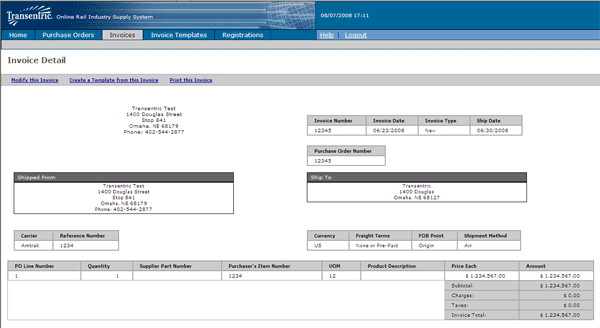
The five processing links at the top of the Invoice are used as follows:
- View Purchase Order:
Click on this link to display the Purchase Order associated with this Invoice.
The PO is displayed in the Purchase Order Detail window.
- Modifty this Invoice:
Click on this link to make corrections to this Invoice. After making the
corrections you can re-send the Invoice to the appropriate Railroad.
- Delete this Invoice:
Click on this link to permanently delete this Invoice from ORISS.
(Caution - the Invoice is deleted immediately when you click on this link).
- Create a template form this Invoice:
Click on this link to create a Template from this Invoice. The Create Invoice
Template window is displayed and the information from this Invoice is transferred
to the Template form.
- Print this Invoice:
Click on this link to print a copy of the Invoice. Subsequent Print options
depend on your own system settings and are performed outside of ORISS.
The Create Invoice section of the window is used to create and submit invoices to
the Railroads that your Company has registered with.
If you are a full ORISS user, all of the options identified below are displayed.
The "Purchase Order" option is not displayed if you are an "Invoice only" user.
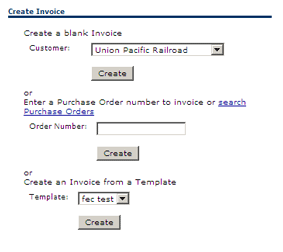
Create a Blank Invoice
Select this option if you want to create a "blank" Invoice. When creating a "blank"
Invoice you will need to manually enter all of the required Invoice detail.
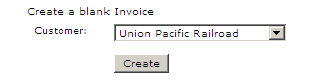
- Click on the Customer drop-down box and click the name you wish to invoice.
- Click on the Create button and then the Create Invoice window is displayed to
enter the invoice details.
Create Invoice from Purchase Order
Select this option if you want to create an Invoice from an existing Purchase Order.
When you select this option, detailed information from the Purchase Order is transferred to
the Invoice form. You will complete the Invoice by adding any additional required fields.
You will also have the ability to modify any of the Purchase Order information on the
Invoice form.
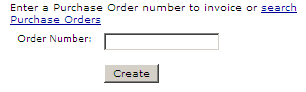
If you know the purchase order number:
- Enter the PO number in the Order Number field.
- Click on the Create button and the Create Invoice window will be displayed to
enter the Invoice detail.
If you do not know the purchase order number:
- Click on Search Purchase Orders link, and the Purchase Orders window will be
displayed to enter your search options.
- After finding the desired Purchase Order, you will see the option to "Create
Invoice from this Order" on the Purchase Order Detail window.
Create Invoice from a Template
Select this option if you want to create an Invoice using a previously created
Invoice Template.
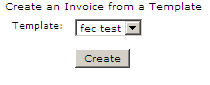
- Click on the Template drop-down box, and select the desired Template.
- Click on the Create button and the Create Invoice window will be displayed
to complete the Invoice.
Note: If you are having trouble filling out the Invoice, contact
the railroad you are trying to invoice. They, NOT Transentric, will know what information is
needed and what goes where. The railroad contact information can be found on the Home page,
under Quick Links.
Whether you create a blank invoice, an invoice from a purchase order, or an invoice
from a template this Create Invoice window will appear once you click create.
Most of the information on the Invoice is "freeform" input. That is, the information
you enter is not validated. Before sending the Invoice to the Customer, be sure that
you review and verify the complete Invoice.
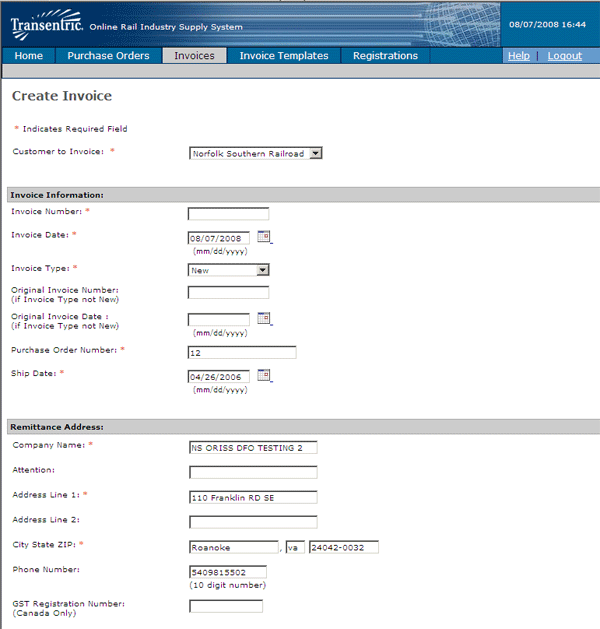
There are eight sections to the invoice:
- Invoice Information: This section is used to enter detailed information
on the invoice. The fields include:
- Number:
Enter your Invoice number.
- Date:
Enter the Invoice Date in mm/dd/yyyy format, or you can click on the Calendar
icon to display the Pop-up Calendar window to select a date.
- Type:
Click on this text box to display the Type options. The industry definitions
of the Invoice Types are:
- New: Indicates that this is the original transmission of this Invoice
for product or services.
- Correction: Indicates that this Invoice replaces a previously transmitted Invoice.
- Credit Memo: Indicates that this is a credit adjustment to a previously
transmitted Invoice.
- Debit Memo: Intended to be used for freight or other
special charges that were not included in a previously transmitted
Invoice. The Debit Memo is not used to adjust the price of a previously
transmitted line item.
- Material Credit: Indicates that this is a credit that reverses a previously
Invoiced quantity.
- Original Invoice #(optional):
If you are issuing a correction or adjustment to a previously transmitted Invoice,
enter the original Invoice number.
- Original Invoice date(optional):
If you are issuing a correction or adjustment to a previously transmitted Invoice,
enter the original Invoice date.
- Purchase Order Number:
Enter the Railroad's Purchase Order number.
- Ship Date:
Enter the date when the material was shipped or when the service was performed in
mm/dd/yyyy format. Or, you can click on the Calendar icon to display the Pop-up
Calendar window to select a date.
- Remittance Address:
This section is generated from the information that you provided on the ORISS
Registration form for the selected Railroad. You may change information as
necessary for this Invoice, but all required fields must be completed. If this
Invoice is for a Canadian Customer, enter your Goods and Services Tax Registration
number in the GST Registration Number field.
- Shipped from Address:
This section is used to identify the specific location where the material was
shipped from. If this is the same as the Remittance Address, you can click
on the Use Remittance Address check-box. Otherwise, you must complete at least
the required fields in this section.
- Ship to Address:
This section of the Invoice is used to identify the location where the material
was shipped to. The receiving Company Name, street address, City, State and Zip
code are required.
Note: If the invoice is being picked up, fill out this section with the
information of the company whos picking up the invoice.
- Bill to Address:
This section of the Invoice is only required if the customer being invoiced is
Canadian Pacific.
- Payment Terms:
- Currency:
Click on this text-box and select either US if payment must be in US Dollars,
or, click on Canada if payment must be in Canadian Dollars.
- Percent Discount:
If your payment terms include a discount percentage for early payment, enter
the rate here. The rate can be a whole number or a decimal percent. Example:
For a 2 percent discount rate you can enter either "2" or "2.0". For a 2
percent discount, enter "2.5".
- Discount Days:
If a discount percent applies, enter the number of days in the discount period.
Invoice must be paid within this time period in order for the discount percent to apply.
- Net Days:
Number of days until the total invoice amount is due (discount does not apply).
- Freight Terms:
Click on this text box and select the appropriate Freight Term:
- None or Pre-Paid: Shipper responsible for freight charges.
- Collect: Consignee responsible for freight charges.
- Pre-Pay and Add: Typically means that the shipper advances the freight
charges to the carrier and then bills the beneficial owner of the freight
for an amount approximating or equal to the actual freight charges.
- FOB Point:
Click on this text-box and select the Free On Board point:
- Origin: Title to the merchandise passes at time and place of pick-up.
- Destination: Title to the merchandise passes at time and place of
delivery
- Shipment Method:
Click on this text box and select the appropriate Shipping Method.
- Carrier Information:
This section of the Invoice identifies the Carrier used to ship the material.
You must enter the Carrier's name. The associated Reference Number and the Bill
of Lading number are options.
- Line Items:
This section of the Invoice is the area used to enter detail information about
the product or service provided. This section is also used to identify the
charges for your product/service.